Thursday, September 30, 2010

Bumper Bumper

So my second try at the bumper, and I loved it!  It's not that sewing a bumper is really hard, it's just very long (in length) so it can seem a bit tedious at times.  But it was a very fun project that I truly adored.


The first bumper I made was more difficult, as it was more like a box, with a top, side and bottom, which meant double the piping, more fabric, more stuffing and more headache.  This time I decided that I would just do a flat bumper with piping that went all the way around making it much faster and easier to manage.

Last time around, I also made my own ties out of bias tape, and did about half of my own piping.  So this time I decided that I would make all of my own piping and ties, but use fabric instead of bias tape. (Which gives you far more design options!!)

The ties are a bit time consuming, because you need 22-24 ties, and it involves quiet a bit of ironing and sewing.


I cut 22 strips @ 2.5" x 20", pressed 1/4" to wrong side on all
 edges of tie pieces. Then folded them in half and pressed again, and
finished each tie with an edge stitch.
For the piping I also cut around 14 strips of fabric @ 2.5" x 42" (you'll want it to be the length of entire bumper including top, bottom and sides the total will be about about 336" )
You will also need just over 9 yards of chord for inside the piping.
Before you assemble your piping, you will want to sew your strips together.   
            • TIP ** Cut the end of your strips on angle to sew them together.  I was taught in a sewing class that by sewing strips together on an angle instead of a flat edge, the seam will be less obvious to the eye, and look more like one strip then several pieced together.
So I then took my long piece of fabric, folded it in half and ironed it. And, since I am sort of lazy when it comes to using pins I just stuffed the chord in the folded strip and started sewing. Pushing the fabric as tight around the chord as I could get it.  I don't have a piping foot for my machine, but the zipper foot worked just fine!

You can see the ties along the back of the crib. 1 in the corner, middle, seam, middle, corner.
For the bumper cover you'll want 12 pieces of fabric, 27" x 11 3/4".
(I did 6 pieces of the plaid, and 6 pieces of the navy.)
Then sew 6 pieces together for the front and 6 pieces for the back.
Use a 3/8" seam allowance.
Next pin down the piping, selecting the fabric that you want as the front side of your bumper, and starting on what will be the side of your bumper.  Pin down your piping around the entire piece of fabric (pin piping down so fabric edge is on top).
Next you will want to decided where you want your tie strips. (I placed ties at each of the six seams, and then added ties in between 4 of the fabric segments for the front and back of crib (see caption above.).
Fold tie strips in half and pin the folded edge underneath the piping and on top of the fabric. Sew together.
Then on the wrong side of your fabrics you will want to sew the remaining six pieces on to the bumper, leaving one edge open. (basically sewing your bumper together inside out.)

Okay we are almost done!!  And it is time to announce my star bumper moment....  I decided to add a zipper to the end of the bumper!  Woohoo genius!! Seriously, this one move made the bumper sooooo much easier, because once you sew the zipper on, you are done sewing and ready to stuff!
Buy a standard 10 inch zipper. Sew it on while your bumper is still inside out, use your zipper foot.
Now you are ready to pull your bumper right side out and start stuffing. 
This time instead of batting I decided to use foam. I got a pack of Fairfield Nu-foam at Joann's that is made specifically for crib bumpers.  The foam was great! It comes in six foam pieces which makes it so easy to stuff in, and holds the bumper up straight.
Stuff in your foam, zip up the side, and your bumper is crib ready!!!


Tuesday, September 21, 2010

Decorating with fabric

So being in love with the "Truck Stop" fabric, I had to do more with it than just use it for crib sheets. So I came up with this easy inexpensive way to decorate with fabric.  
(Also, if you make your own crib sheets this is a great way to use up your left over fabric up from the corners of your sheets!)
At Michaels I bought 4 little wood rectangle boards at about $0.97, a spool of ribbon at about $2.97 and I used an old bottle of Mod Podge that I think I've had since college. (ignore the little yellow canvas up top, stencils and paint. It was an interesting project that I will explain later :))
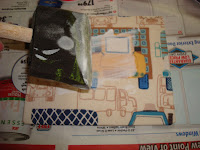
So next, I  covered the wood boards with Mod Podge. I used an old sponge brush that I had, but I'm sure you could use an old kitchen sponge or a paint brush. (just make sure you wash everything out when you are finished other wise your tool will dry stiff and be ruined.)
 
Then I placed the wood board into the center of my fabric. I had previously cut my fabric into squares that were slightly bigger than the boards, allowing space for a boarder that could be folded around the back of the board.  I then flipped the board over and applied Mod Podge around the boarder.


I then folded the fabric on to the back and painted down the sides with more Mod Podge. Then giving it a few minutes to dry I flipped it over and painted over the front.

After letting it dry, I got out my hottie glue gun, slapped some glue on the back with ribbon that I had premeasured and cut (so that they would all hang at the same length) and Ta-dah! I had matching  decor to go with his bedding.
Also shown in the center  is a name frame that I made.  This came from the stencil canvas project I was telling you about earlier.  I tried to use paint and stencils.. and it was a nightmare! The paint smudged everywhere and ruined the canvas. So then I tried using markers on fabric I was going to cover the canvas with, but then with my pregnant brain I somehow spelled Griffin's name wrong I think twice before I finally gave up on the stencils lol.. So finally, I ended up taking more leftover fabric and wrapping it around the edges of the wood that the canvas was on (since by now I had cut off the canvas b/c of my previous mistakes :)), and I used more Mod Podge to hold it onto the frame.  Then, I went back to Michaels and bought iron on letters (no painting required thankfully).  I placed the letters onto another leftover piece of fabric, hot glued it onto the back of the frame, and finished up by gluing on more ribbon to the back of the frame to hang it from.  Funny that when working on projects sometimes your favorite things come out of the mistakes you make. I am so happy that I made such a mess with the stencils, because I love the name frame way more than my initial idea.

Monday, September 20, 2010

A Boy's nursery

When I started sewing this spring, I decided that I wanted to attempt sewing my own nursery bedding for my second baby that is due October 1st.  Luckily enough my friend Melissa was having her baby first, and she allowed me to use her nursery as my starting point.  I learned a lot from doing her set, and I was eager to take what I learned and start on my next set.
I think we found out we were having a little boy around May, and although I am beyond words excited and so blessed to be having a boy, I was a little torn when it came to the bedding department.  I already had in mind what I wanted to make for another little girl, and I hadn't really seen anything out there that I currently liked for a boy, so I had no idea what I should do.
Then I went to Piece by Piece (http://www.piecebypiecefabrics.com/) a wonderful fabric store in Eugene. It took me a few trips, but finally I found what I was looking for.  A fabric called "Truck Stop" from The Alexander Henry fabric collection, and it was perfect.  It wasn't too baby, or too cartoonie, and it was just masculine enough! So Yay, I finally had a theme and the beginning of a color scheme. 
I decided that I wanted to use the Truck Stop fabric for the fitted sheets and small accents, so I still needed to find a few other fabrics that would compliment it for the bumper, skirt and quilt. I found the rest of my fabrics at JoAnn's.  Although I love Piece by Piece, you can't beat Jo's 40% off coupons on their already nicely priced fabric. I went with 2 main fabric colors: A blue quilted plaid that I thought would be masculine enough to take his bedding into the toddler years, and a chocolate brown that meshed nicely with the tractors on the sheet fabric.  I wanted to do something different for my accent color for the piping and binding, so I chose a sunflower yellow that goes with the whole construction/ road theme.
After talking to one of my close friends, and telling her about my fabric choices. She brought to my attention that yellow and brown were also the colors of pee and poo! Ha, so after a day or two of going over my options, I decided that a navy blue would actually be a better compliment to my yellow, Ha! So thanks Christina for your keen observation! (However, in my defense I still think my first choice would have been very cute and maybe even helped out in the potty training department :))  But I am really happy with the navy blue, and how everything turned out for my second attempt in the bedding business and my first attempt in designing bedding for a boy.
xo